지난 포스팅에서 Blinn-Phong Reflection Model에 대해 알아봤다.
Shading은 그래픽스에서 음영 처리를 하는 방법으로 크게 3가지가 존재한다.
Flat Shading
Flat Shading은 메쉬에서 각각의 면(face)에 단일 Lighting Value를 사용하는 기법이다.
한 삼각형의 픽셀에 들어오는 빛의양은 동일하기 때문에 flat 하게 보인다.
플랫 쉐이딩을 하기 위해서, 각 특정 삼각형으로부터의 모든 픽셀들은 같은 벡터를 사용한다.
대신에 텍스처의 색상은 그대로 사용 할 수 있으므로 빛의 벡터는 같아도 색상은 달라질 수 있다.
basis 포인트로써 삼각형의 표면 어느 지점이든 선택할 수 있다. 일반적으로는 첫번째 vertex나 centroid를 선택한다.
Blinn-Phong Reflection Model에서는 Specular Light를 포함하고 있지만, Flat Shading에서는 생략된다.
* 프레넬 라이팅도 효과가 적어 사용하지 않는다.
Flat Shading은 매우 효율적인 렌더링 기법이면서 최적화면에서 좋은 성능을 보여준다. 특히 low-poly 모델과 궁합이 좋다.
Shader "Lucid-Boundary/Lighting_FlatShading"
{
    Properties
    {
        _MainTex ("Texture", 2D) = "white" {}
        _BaseColor("Base Color", Color) = (1, 1, 1, 1)
    }
    SubShader
    {
        Tags
        {
            "RenderType"="Opaque"
            "Queue" = "Geometry"
            "RenderPipeline" = "UniversalPipeline"
        }

        Pass
        {
            Tags
            {
                "LightMode" = "UniversalForward"
            }

            HLSLPROGRAM
            #pragma vertex vert
            #pragma fragment frag

            #include "Packages/com.unity.render-pipelines.universal/ShaderLibrary/Core.hlsl"
            #include "Packages/com.unity.render-pipelines.universal/ShaderLibrary/Lighting.hlsl"

            struct appdata
            {
                float4 vertex : POSITION;
                float3 uv : TEXCOORD0;
                float3 normalOS : NORMAL;
            };

            struct v2f
            {
                float2 uv : TEXCOORD0;
                float4 vertex : SV_POSITION;
                nointerpolation float4 flatLighting : TEXCOORD1;
            };

            texture2D _MainTex;
            SamplerState sampler_MainTex;

            CBUFFER_START(UnityPerMaterial)
                float4 _BaseColor;
                float4 _MainTex_ST;
            CBUFFER_END


            v2f vert (appdata v)
            {
                v2f o;
                o.vertex = TransformObjectToHClip(v.vertex);
                o.uv = TRANSFORM_TEX(v.uv, _MainTex);
                float3 normalWS = TransformObjectToWorldNormal(v.normalOS);

                // Ambient
                float3 ambient = SampleSHVertex(normalWS);

                // Diffuse
                Light mainLight = GetMainLight();
                float3 diffuse = mainLight.color * max(0, dot(normalWS, mainLight.direction));

                o.flatLighting = float4(ambient + diffuse, 1.0f);

                return o;
            }

            float4 frag (v2f i) : SV_Target
            {
                float4 tex = SAMPLE_TEXTURE2D(_MainTex, sampler_MainTex ,i.uv);
                return tex * _BaseColor * i.flatLighting;
            }
            ENDHLSL
        }
    }
}
Flat Shading 코드 리뷰
(1) #include "Packages/cohttp://m.unity.render-pipelines.universal/ShaderLibrary/Lighting.hlsl"
유니티 내부 쉐이더인 Lighting 을 가져온다.
(2) appdata, v2f
NORMAL 값을 저장할 normalOS
float4로 되어있는 flatLighting이 추가되어있다.
여기서 flatLighting은 Fragment Shader에서 모든 빛 연산이 끝난 최종 컬러에 해당한다.
nointerpolation이 FlatShading의 핵심이다.
https://learn.microsoft.com/ko-kr/windows/win32/direct3dhlsl/dx-graphics-hlsl-struct
구조체 형식 - Win32 apps
구조체 형식
learn.microsoft.com
nointerpolation은 보간 한정자라고 하여, default는 linear이다.
각 픽셀의 normal vector를 받아온다고 되어있지만, 실제로는 삼각형으로부터 받아오는 normal vector이다.
그래서 interpolation을 막아야 한다.
(3) vert
normalWS = TransformObjectToWorldNormal(v.normalOS)
각 vertex의 노말을 World Space에서의 Normal로 변환한다.
Ambient Light를 구하는 방법은 SampleSHVertex 함수를 이용한다.
SH는 구면 조화 함수(spherical harmonics)의 약자라고 한다.
함수 자체의 구조는 더 깊숙히 들어가보지 않았지만, SH를 이용하면 Light Source가 달라져도 그에 대응하는 구면 좌표의 coefficents 값들도 실시간으로 달라지게 되기 때문에 효율적으로 연산량을 줄일 수 있다고 한다.
이 함수 자체가 왜 Ambient Light로 이어지는지는 정확히 이해하지는 못했지만..
입력값을 Normal로 받고 있으니, 모든 Vertex의 Normal에 해당하는 빛 정보를 가져온다고 이해하면 되려나 싶다.
(꽤 그럴듯한 추론 아닌가?)
GetMainLight() 는 Light.hlsl 파일을 가져왔을 때, 쓸 수 있는 함수이다.
그냥 막연히 Scene의 메인이 되는 빛을 가져온다고 되어있다.
그러면 앞서 포스팅했던 Diffuse Light의 광원 벡터 역할을 한다고 이해하자.
Diffuse Light = Light_Color * max(0, dot(normalWS, mainLight.Direction)) 수식을 떠올리면 된다.
최종적으로 o.flatLight은 float4이다.
Alpha = 1.0으로 하되, 앞에 RGB를 Diffuse + Ambient로 채우는거다.
(4) frag
별거없이 텍스처를 샘플링하고 앞서 구했던 floatLight를 곱해준다.

정확히 잘 동작한다!
여기에 nointerpolation 한정자를 없애면 Flat한 느낌이 전혀 들지 않으니 유의하자.
Flat Shading Shader Graph로 구현하기
우리는 이제 빛을 다루는 상황이니, Lit 쉐이더 그래프로 작성해야 한다.

Properties는 Texture와 Color 정도만 넣자.
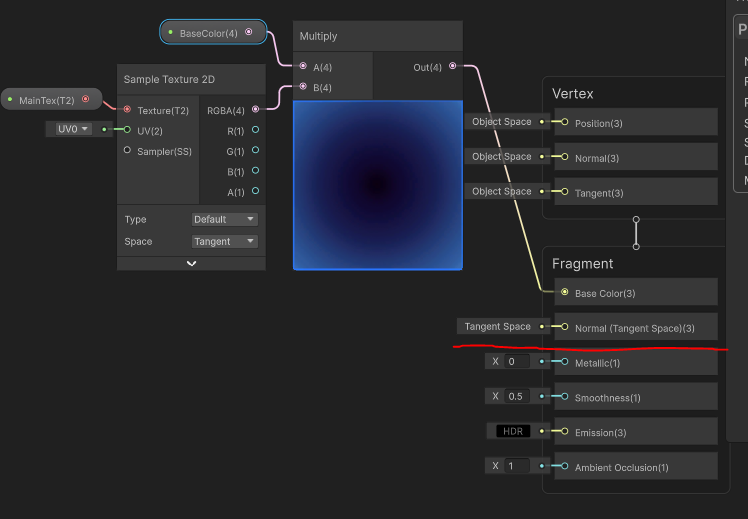
기본적인 준비는 된 상태이다.
Flat Shading을 위해서는 Fragment Shader의 Normal 부분을 보자.

처음엔 이게 뭔가 싶었다.
노드에 대해서도 분석을 해보자면..
Position은 일단 World 좌표계의 현재 픽셀의 위치를 알아낸 것이다.
문제는 현재 픽셀 정보는 알고 있지만, 주변이 같은 삼각형인지를 알 수가 없다.
하지만 삼각형은 항상 Flat 한 것을 알고 있기 때문에 이를 이용해야 한다.
DDX, DDY 부분 미분 함수니 어렵게 단어를 설명하지만
근접 픽셀과의 차이를 나타내는 값이다.
X축으로, Y축으로..
그리고 이 둘을 Cross Product 해주면 노말 벡터가 되어준다.
해당 기법은 픽셀간의 차이를 알아내는 좋은 방법이므로 기억해두자.
물론 성능면으로는 HLSL 쪽이 더 좋다. SH의 위엄..
Gouraud Shading
구로? 고러드? 이름이 참..
Gouraud Shading는 각 픽셀의 Lighting Value들을 얻기 위해 Vertex간에 보간되어 모든 픽셀을 평가하여 빛의 총양을 구한다.
듣기만 해도 연산량이 클 것 같은 느낌이 든다.
보간하기 때문에 물론 Flat Shading 보다 더욱 Gradient하게 표현되고, Specular Light를 사용 할 수 있다.
하지만, 고해상도, 하이폴리 오브젝트에 대해서는 피하는게 좋다.
이유는 나중에 설명하겠다.
Shader "Lucid-Boundary/Lighting_GouraudShading"
{
    Properties
    {
        _MainTex ("Texture", 2D) = "white" {}
        _BaseColor("Base Color", Color) = (1, 1, 1, 1)
        _GlossPower("Gloss Power", Float) = 400
    }
    SubShader
    {
        Tags
        {
            "RenderType"="Opaque"
            "Queue" = "Geometry"
            "RenderPipeline" = "UniversalPipeline"
        }

        Pass
        {
            Tags
            {
                "LightMode" = "UniversalForward"
            }

            HLSLPROGRAM
            #pragma vertex vert
            #pragma fragment frag

            #include "Packages/com.unity.render-pipelines.universal/ShaderLibrary/Core.hlsl"
            #include "Packages/com.unity.render-pipelines.universal/ShaderLibrary/Lighting.hlsl"

            struct appdata
            {
                float4 vertex : POSITION;
                float3 uv : TEXCOORD0;
                float4 normalOS : NORMAL;
            };

            struct v2f
            {
                float2 uv : TEXCOORD0;
                float4 vertex : SV_POSITION;
                float4 diffuse: TEXCOORD1;
                float4 specular: TEXCOORD2;
            };

            texture2D _MainTex;
            SamplerState sampler_MainTex;

            CBUFFER_START(UnityPerMaterial)
                float4 _BaseColor;
                float4 _MainTex_ST;
                float _GlossPower;
            CBUFFER_END


            v2f vert (appdata v)
            {
                v2f o;
                o.vertex = TransformObjectToHClip(v.vertex);
                o.uv = TRANSFORM_TEX(v.uv, _MainTex);
                float3 normalWS = TransformObjectToWorldNormal(v.normalOS);
                float3 positionWS = mul(unity_ObjectToWorld, v.vertex);
                float3 viewWS = GetWorldSpaceNormalizeViewDir(positionWS);

                // Ambient = Sampled Vertex From Spherical Harmonics with Normal Vector
                float3 ambient = SampleSHVertex(normalWS);

                // Diffuse = Color * max(0, dot(Normal, LightSource))
                Light mainLight = GetMainLight();
                float3 diffuse = mainLight.color * max(0, dot(normalWS, mainLight.direction));

                // Specular = Color * Dot(Half Vector Between LightSource and Viewer, NormalVector)^power
                float3 halfVector = normalize(mainLight.direction + viewWS);
                float specular = max(0, dot(normalWS, halfVector));
                specular = pow(specular, _GlossPower);
                float3 specularColor = mainLight.color * specular;

                o.diffuse = float4(ambient + diffuse, 1.0f);
                o.specular = float4(specularColor, 1.0f);

                return o;
            }

            float4 frag (v2f i) : SV_Target
            {
                float4 tex = SAMPLE_TEXTURE2D(_MainTex, sampler_MainTex ,i.uv);
                return tex * _BaseColor * i.diffuse + i.specular;
            }
            ENDHLSL
        }
    }
}
Gouraud Shading 코드 리뷰
Flat Shading과 구조 자체는 거의 비슷하지만, Specular Light가 추가 되었다.
GetWorldSpaceNormalizeViewDir (= normalize(_WorldSpaceLightPos0 + viewWS))
Specular Light는 관찰자 v 도 고려해야 하기 때문에 View Space에서의 좌표도 필요하다.
halfVector를 구할 때, 관찰자 벡터와 광원의 벡터를 이용한다.
아래 수식들 자체는 앞서 설명했던 Light 공식을 따른다.
수식을 이해하고 보니 그렇게 어렵진 않을 것이다.
_GlossPower는 빛의 세기이다. 이 역시 Specular Light를 고려해서 만든 Properties 이다.

Phong Shading
Phong Reflection Model의 그 Phong과 혼동되는 경우가 있는데
라이팅 모델과 Phong Shading은 서로 다른 것이라고 인지하자.
Phong Shading은 보간 기법 (interpolation)이다.
Gouraud Shading 의 경우에는, vertex마다 라이팅을 계산하고 보간한다. (vert 에서 이루어진다.)
Phong Shading은 노말 벡터와 뷰 벡터를 Fragment Shader에서 보간하고, 노말라이즈 한다.
그렇기 때문에 라이팅은 Fragment 별로 계산된다.
이는 Gouraud Shading 보다도 큰 연산 비용이 들어가는데, 현실과 거의 비슷하게 효과를 내기 때문에 가장 많이 쓰이는 기법이다.
Phong Shading은 Ambient, Diffuse, Specular 라이트를 모두 통합하면서 Fresnel 라이팅을 추가하기에도 매우 좋다.
Shader "Lucid-Boundary/Lighting_PhongShading"
{
    Properties
    {
        _MainTex ("Texture", 2D) = "white" {}
        _BaseColor("Base Color", Color) = (1, 1, 1, 1)
        _GlossPower("Gloss Power", Float) = 400
    }
    SubShader
    {
        Tags
        {
            "RenderType"="Opaque"
            "Queue" = "Geometry"
            "RenderPipeline" = "UniversalPipeline"
        }

        Pass
        {
            Tags
            {
                "LightMode" = "UniversalForward"
            }

            HLSLPROGRAM
            #pragma vertex vert
            #pragma fragment frag

            #include "Packages/com.unity.render-pipelines.universal/ShaderLibrary/Core.hlsl"
            #include "Packages/com.unity.render-pipelines.universal/ShaderLibrary/Lighting.hlsl"

            struct appdata
            {
                float4 vertex : POSITION;
                float3 uv : TEXCOORD0;
                float4 normalOS : NORMAL;
            };

            struct v2f
            {
                float2 uv : TEXCOORD0;
                float4 vertex : SV_POSITION;
                float3 normalWS : TEXCOORD1;
                float3 viewWS : TEXCOORD2;
            };

            texture2D _MainTex;
            SamplerState sampler_MainTex;

            CBUFFER_START(UnityPerMaterial)
                float4 _BaseColor;
                float4 _MainTex_ST;
                float _GlossPower;
            CBUFFER_END


            v2f vert (appdata v)
            {
                v2f o;
                o.vertex = TransformObjectToHClip(v.vertex);
                o.uv = TRANSFORM_TEX(v.uv, _MainTex);
                o.normalWS = TransformObjectToWorldNormal(v.normalOS);

                float3 positionWS = mul(unity_ObjectToWorld, v.vertex);
                o.viewWS = GetWorldSpaceViewDir(positionWS);

                return o;
            }

            float4 frag (v2f i) : SV_Target
            {
                float3 normal = normalize(i.normalWS);
                float3 view = normalize(i.viewWS);

                // Ambient
                float3 ambient = SampleSH(i.normalWS);

                // diffuse
                Light mainLight = GetMainLight();
                float3 diffuse = mainLight.color * max(0, dot(normal, mainLight.direction));

                float3 halfVector = normalize(mainLight.direction + view);
                float specular = max(0, dot(normal, halfVector));
                specular = pow(specular, _GlossPower);
                float3 specularColor = mainLight.color * specular;

                float4 diffuseLighting = float4(ambient + diffuse, 1.0f);
                float4 specularLighting = float4(specularColor, 1.0f);

                float4 tex = SAMPLE_TEXTURE2D(_MainTex, sampler_MainTex ,i.uv);
                return tex * _BaseColor * diffuseLighting + specularLighting;
            }
            ENDHLSL
        }
    }
}
코드 리뷰라고 할 것도 없는게
Gouraud Shading 코드의 vert 부분의 일부를 떼와 Fragment Shader에 넣어준 것 뿐이다.
차이점이라면 Diffuse를 구할 때 SampleSH 함수를 사용한 것 정도?
Fresnel Lgiht Modification
이번엔 프-루넬 효과를 넣어보자.
Phong Shading 코드에서 몇줄만 추가하면 끝이다.
지난 포스팅에서 프루넬 이펙트의 수식을 기억하는가?
Fresnel = (1 - dot(normal, view)) ^ Power
Shader "Lucid-Boundary/Lighting_FresnelWithPhongShading"
{
    Properties
    {
        _MainTex ("Texture", 2D) = "white" {}
        _BaseColor("Base Color", Color) = (1, 1, 1, 1)
        _GlossPower("Gloss Power", Float) = 400
        _FresnelPower("Fresnel Power", Float) = 5
    }
    SubShader
    {
        Tags
        {
            "RenderType"="Opaque"
            "Queue" = "Geometry"
            "RenderPipeline" = "UniversalPipeline"
        }

        Pass
        {
            Tags
            {
                "LightMode" = "UniversalForward"
            }

            HLSLPROGRAM
            #pragma vertex vert
            #pragma fragment frag

            #include "Packages/com.unity.render-pipelines.universal/ShaderLibrary/Core.hlsl"
            #include "Packages/com.unity.render-pipelines.universal/ShaderLibrary/Lighting.hlsl"

            struct appdata
            {
                float4 vertex : POSITION;
                float3 uv : TEXCOORD0;
                float4 normalOS : NORMAL;
            };

            struct v2f
            {
                float2 uv : TEXCOORD0;
                float4 vertex : SV_POSITION;
                float3 normalWS : TEXCOORD1;
                float3 viewWS : TEXCOORD2;
            };

            texture2D _MainTex;
            SamplerState sampler_MainTex;

            CBUFFER_START(UnityPerMaterial)
                float4 _BaseColor;
                float4 _MainTex_ST;
                float _GlossPower;
                float _FresnelPower;
            CBUFFER_END


            v2f vert (appdata v)
            {
                v2f o;
                o.vertex = TransformObjectToHClip(v.vertex);
                o.uv = TRANSFORM_TEX(v.uv, _MainTex);
                o.normalWS = TransformObjectToWorldNormal(v.normalOS);

                float3 positionWS = mul(unity_ObjectToWorld, v.vertex);
                o.viewWS = GetWorldSpaceViewDir(positionWS);

                return o;
            }

            float4 frag (v2f i) : SV_Target
            {
                float3 normal = normalize(i.normalWS);
                float3 view = normalize(i.viewWS);

                // Ambient
                float3 ambient = SampleSH(i.normalWS);

                // diffuse
                Light mainLight = GetMainLight();
                float3 diffuse = mainLight.color * max(0, dot(normal, mainLight.direction));

                // specular
                float3 halfVector = normalize(mainLight.direction + view);
                float specular = max(0, dot(normal, halfVector));
                specular = pow(specular, _GlossPower);
                float3 specularColor = mainLight.color * specular;

                // fresnel
                float fresnel = 1.0f - max(0, dot(normal, view));
                fresnel = pow(fresnel, _FresnelPower);
                float3 fresnelColor = mainLight.color * fresnel;
                fresnelColor = fresnelColor * float3(0.0f, 0.0f, 1.0f);

                float4 diffuseLighting = float4(ambient + diffuse, 1.0f);
                float4 specularLighting = float4(specularColor + fresnelColor, 1.0f);

                float4 tex = SAMPLE_TEXTURE2D(_MainTex, sampler_MainTex ,i.uv);
                return tex * _BaseColor * diffuseLighting + specularLighting;
            }
            ENDHLSL
        }
    }
}
fresnel 효과를 추가한게 전부이다.
흰색 오브젝트라 fresnel 효과를 확인하기 조금 힘들어서 Blue 컬러를 곱해주었다.

마치며
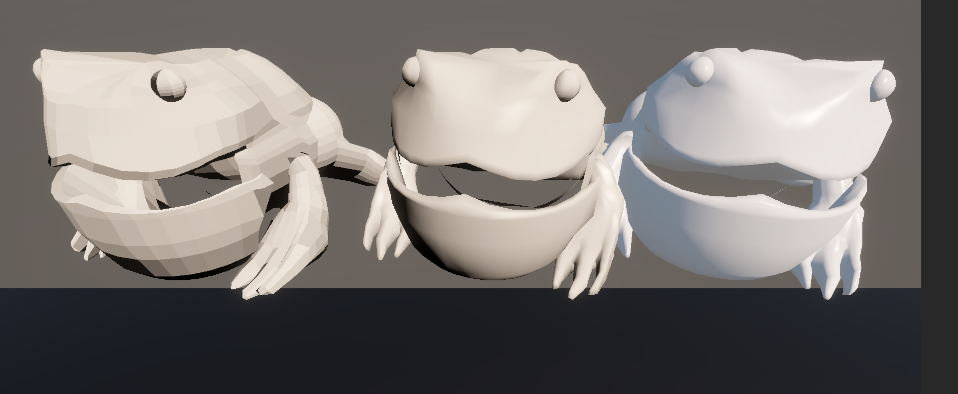
지금까지 3개의 Shading을 알아보았다.
Shader Graph도 마저 추가해야 하는데.. 시간이 남으면 추가하도록 하겠다.
다음 포스팅은 드디어... PBR이다..
'Game Dev > Unity Shader' 카테고리의 다른 글
| 18. Shadow Casting - 다니엘 릿 쉐이더 프로젝트 (0) | 2025.10.21 |
|---|---|
| 17. Physically Based Rendering (PBR) - 다니엘 릿 쉐이더 프로젝트 (0) | 2025.10.21 |
| 15. Lighting And Shadow - 다니엘 릿 쉐이더 프로젝트 (1) | 2025.10.18 |
| 14. UsePass, GrapPass - 다니엘 릿 쉐이더 프로젝트 (0) | 2025.10.18 |
| 13. Shader Keywords - 다니엘 릿 쉐이더 프로젝트 (0) | 2025.10.18 |