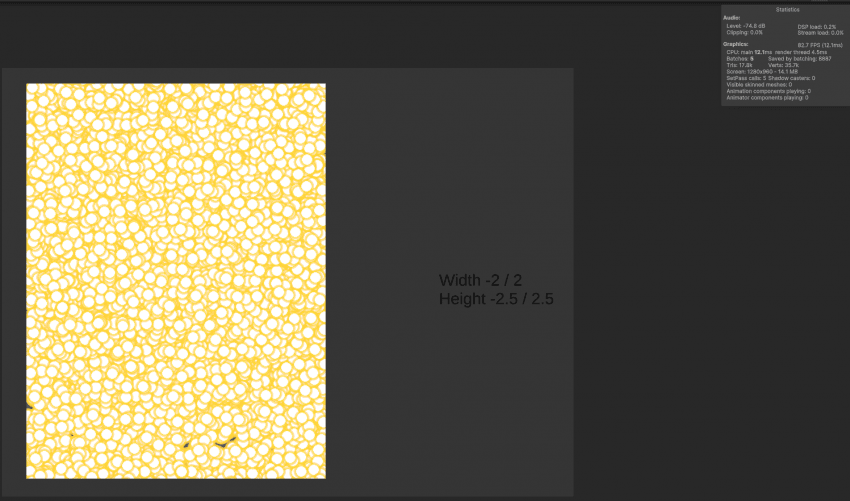
SetPass = 5, Batch = 5
현재 만들고 있는 탄막 게임의 실험용 연출로 생성 해보았다.
어려운 Job과 개념적인 부분들을 앞에서 알게되었으니
이제는 좀 더 게임 매니징 적인 부분들을 포스팅 하고자 한다.
그래도 포스팅 내용은 샘플 프로젝트를 기준.
이번에 볼 샘플 예제는
4번 (Prefabs), 10번 (Random Spawn), 7번 (EnableableComponents) 이다.
이번 예제는 딱히 Docs 분석이 필요하진 않을 것 같다.
대신에 예제 코드를 보면서 리뷰하고, 직접 만들어보자.
4번 예제 (Prefabs)
GameObject인 프리팹을 엔티티화 시켜서
생성 시켜주는 예제이다.
using HelloCube.Prefabs;
using Unity.Entities;
using UnityEngine;

namespace HelloCube.Prefabs
{
    // An authoring component is just a normal MonoBehavior that has a Baker<T> class.
    public class SpawnerAuthoring : MonoBehaviour
    {
        public GameObject Prefab;

        // In baking, this Baker will run once for every SpawnerAuthoring instance in a subscene.
        // (Note that nesting an authoring component's Baker class inside the authoring MonoBehaviour class
        // is simply an optional matter of style.)
        class Baker : Baker<SpawnerAuthoring>
        {
            public override void Bake(SpawnerAuthoring authoring)
            {
                var entity = GetEntity(TransformUsageFlags.None);
                AddComponent(entity, new Spawner
                {
                    Prefab = GetEntity(authoring.Prefab, TransformUsageFlags.Dynamic)
                });
            }
        }
    }

    struct Spawner : IComponentData
    {
        public Entity Prefab;
    }
}
SpawnerAuthoring 코드부터 보자.
프리팹은 Authoring 코드에서 넣어주고 있으며,
Spawner라는 IComponentData 안에는 Entity 타입으로 넣어주고 있다.
GameObject를 엔티티화 시켜서 컴포넌트에 저장하는 방식이다.
TransformUsagesFlags 는 Dynamic 형태로 엔티티화 시켜주고 있다.
TransformUsagesFlags는 베이킹 프로세스에서 어떻게 MonoBehaviour 데이터를 엔티티로 변환 시켜줄 지 정하는 플래그이다. 자세한 내용은 Docs에서 확인해보자.
SpawnerEntity는 Prefab을 엔티티로 들고 있는 Spawner를 컴포넌트로 가지고 있다고 이해하자.
https://docs.unity3d.com/Packages/com.unity.entities@1.3/manual/transforms-usage-flags.html
Transform usage flags | Entities | 1.3.5
Transform usage flags Transform usage flags control how Unity converts Transform MonoBehaviour components to entity data. You can use the values in TransformUsageFlags to define what transform components are added to the entities during the baking process.
docs.unity3d.com
using Unity.Burst;
using Unity.Collections;
using Unity.Entities;
using Unity.Mathematics;
using Unity.Transforms;

namespace HelloCube.Prefabs
{
    public partial struct SpawnSystem : ISystem
    {
        uint updateCounter;

        [BurstCompile]
        public void OnCreate(ref SystemState state)
        {
            // This call makes the system not update unless at least one entity in the world exists that has the Spawner component.
            state.RequireForUpdate<Spawner>();

            state.RequireForUpdate<ExecutePrefabs>();
        }

        [BurstCompile]
        public void OnUpdate(ref SystemState state)
        {
            // Create a query that matches all entities having a RotationSpeed component.
            // (The query is cached in source generation, so this does not incur a cost of recreating it every update.)
            var spinningCubesQuery = SystemAPI.QueryBuilder().WithAll<RotationSpeed>().Build();

            // Only spawn cubes when no cubes currently exist.
            if (spinningCubesQuery.IsEmpty)
            {
                var prefab = SystemAPI.GetSingleton<Spawner>().Prefab;

                // Instantiating an entity creates copy entities with the same component types and values.
                var instances = state.EntityManager.Instantiate(prefab, 5000, Allocator.Temp);

                // Unlike new Random(), CreateFromIndex() hashes the random seed
                // so that similar seeds don't produce similar results.
                var random = Random.CreateFromIndex(updateCounter++);

                foreach (var entity in instances)
                {
                    // Update the entity's LocalTransform component with the new position.
                    var transform = SystemAPI.GetComponentRW<LocalTransform>(entity);
                    transform.ValueRW.Position = (random.NextFloat3() - new float3(0.5f, 0, 0.5f)) * 20;
                }
            }
        }
    }
}
SpawnSystem 스크립트를 보자
Spawner를 요구하는 것으로 보아 Spawner 엔티티가 실행할 System 코드이다.
우선, EntityQuery를 만들어주고 있다.
RotationSpeed라는 컴포넌트를 가진 엔티티들을 찾는 쿼리인데
처음 시작 했을 때는 해당 엔티티가 존재할리 없으니
바로 아래에서 IsEmpty 조건을 달생한다.
Spawner 자체는 SubScene에서 하나 존재하므로 SingleTon이며 Prefab 정보를 가져와
EntityManager로 생성 해주고 있다.
Allocator.Temp로 되어있는데, 메모리 관리를 위하여 해당 엔티티의 메모리 해제 시기를 결정하는 플래그이다.
아래 참조 문서는 여러 종류에 대해 정리해둔 Docs 문서이다.
https://docs.unity3d.com/Packages/com.unity.entities@1.0/manual/allocators-overview.html
Allocators overview | Entities | 1.0.16
Allocators overview Entities and the Collections package has different allocators that you can use to manage memory allocations. The different allocators organize and track their memory in different ways. These are the allocators available: Allocator.Temp:
docs.unity3d.com
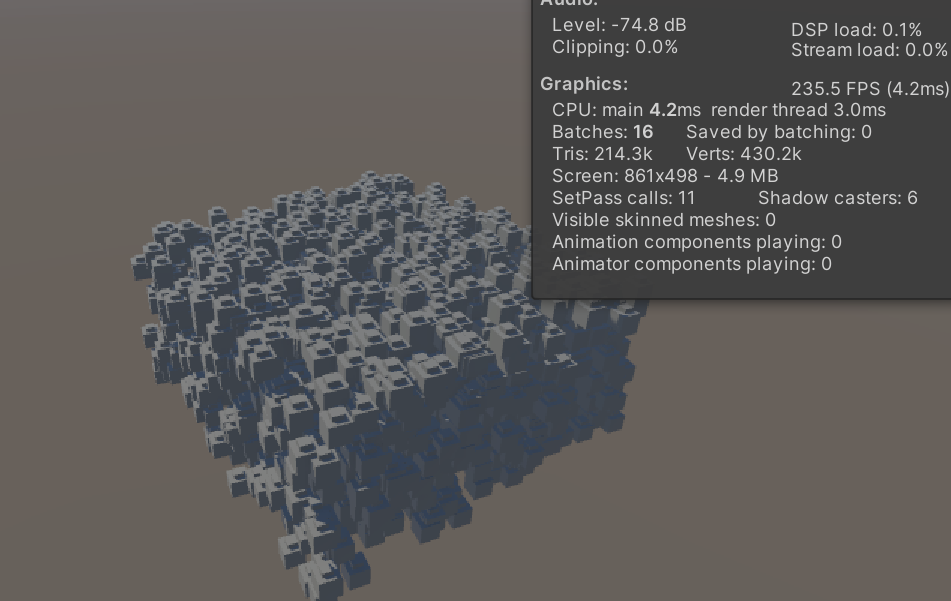
스크립트를 그대로 따르면, 프리팹을 5000개 생성하고 있다.
Random Variable은 Random Seed가 같으면 항상 같은 조합의 임의 값을 내보내게 된다.
Seed를 매번 ++ 시켜서 랜덤을 하더라도 매번 임의로 생성할 수 있다.
foreach문에서는 엔티티들을 랜덤 생성하여, 아래로 이동시키도록 구현되어있다.
using Unity.Burst;
using Unity.Entities;
using Unity.Mathematics;
using Unity.Transforms;

namespace HelloCube.Prefabs
{
    public partial struct FallAndDestroySystem : ISystem
    {
        [BurstCompile]
        public void OnCreate(ref SystemState state)
        {
            state.RequireForUpdate<ExecutePrefabs>();
        }

        [BurstCompile]
        public void OnUpdate(ref SystemState state)
        {
            // rotation
            float deltaTime = SystemAPI.Time.DeltaTime;
            foreach (var (transform, speed) in
                     SystemAPI.Query<RefRW<LocalTransform>, RefRO<RotationSpeed>>())
            {
                // ValueRW and ValueRO both return a ref to the actual component value.
                // The difference is that ValueRW does a safety check for read-write access while
                // ValueRO does a safety check for read-only access.
                transform.ValueRW = transform.ValueRO.RotateY(
                    speed.ValueRO.RadiansPerSecond * deltaTime);
            }

            // An EntityCommandBuffer created from EntityCommandBufferSystem.Singleton will be
            // played back and disposed by the EntityCommandBufferSystem when it next updates.
            var ecbSingleton = SystemAPI.GetSingleton<BeginSimulationEntityCommandBufferSystem.Singleton>();
            var ecb = ecbSingleton.CreateCommandBuffer(state.WorldUnmanaged);


            // Downward vector
            var movement = new float3(0, -SystemAPI.Time.DeltaTime * 5f, 0);

            // WithAll() includes RotationSpeed in the query, but
            // the RotationSpeed component values will not be accessed.
            // WithEntityAccess() includes the Entity ID as the last element of the tuple.
            foreach (var (transform, entity) in
                     SystemAPI.Query<RefRW<LocalTransform>>()
                         .WithAll<RotationSpeed>()
                         .WithEntityAccess())
            {
                transform.ValueRW.Position += movement;
                if (transform.ValueRO.Position.y < 0)
                {
                    // Making a structural change would invalidate the query we are iterating through,
                    // so instead we record a command to destroy the entity later.
                    ecb.DestroyEntity(entity);

                }
            }
        }
    }
}
FallAndDestroySystem은 샘플 큐브를 움직이게 만드는 코드이다.
처음 쿼리를 통해 먼저 큐브 엔티티들을 돌게 만들고
BeginSimulationEntityCommandBufferSystem 시점에 ECB를 생성한 것을 볼 수 있는데,
우선 Update문에서 값들을 처리한 것을 기록하고, 다음 프레임이나 나중에 명령을 처리하도록 조절 할 수 있다.
다음에는 그저 엔티티들의 값을 바꿔주며, 포지션이 0보다 아래일 때, 해당 프레임이 끝난 뒤에 삭제하도록 구현되어있다.
ECB를 굳이 가져오는 이유는
엔티티의 구조를 건드는 행위 (삭제)가 포함되어 있어서 그렇다.
명령 버퍼의 시점을 잘 고려해서 스크립트를 짜도록 하자.

실제로 에디터의 System창에서 해당 ECB의 위치를 알 수 있다.
10번 예제 (RandomSpawn)
10번 예제는 위 4번 Prefab 예제와 매우 유사합니다.
다른 점이 무엇인지 체크해두는게 좋을겁니다.
이번에는 총 4개의 스크립트가 사용됩니다.
using Unity.Entities;
using UnityEngine;

namespace HelloCube.RandomSpawn
{
    public class ConfigAuthoring : MonoBehaviour
    {
        public GameObject Prefab;

        class Baker : Baker<ConfigAuthoring>
        {
            public override void Bake(ConfigAuthoring authoring)
            {
                var entity = GetEntity(TransformUsageFlags.None);
                AddComponent(entity, new Config
                {
                    Prefab = GetEntity(authoring.Prefab, TransformUsageFlags.Dynamic)
                });
            }
        }
    }

    public struct Config : IComponentData
    {
        public Entity Prefab;
    }
}
ConfigAuthoring 코드입니다.
4번 Spawner 처럼 Prefab을 들고 있는 Entity입니다. 이름만 다른 코드네요.
using Unity.Entities;
using UnityEngine;

namespace HelloCube.RandomSpawn
{
    public class CubeAuthoring : MonoBehaviour
    {
        public class Baker : Baker<CubeAuthoring>
        {
            public override void Bake(CubeAuthoring authoring)
            {
                var entity = GetEntity(TransformUsageFlags.Dynamic);
                AddComponent<Cube>(entity);
                AddComponent<NewSpawn>(entity);
            }
        }
    }

    public struct Cube : IComponentData
    {
    }

    public struct NewSpawn : IComponentData
    {
    }
}
CubeAuthoring 코드입니다.
이번에는 큐브에 대한 Authoring 코드가 있네요?
Cube 컴포넌트, NewSpawn 컴포넌트가 들어갑니다.
용도는 없는걸 보니 둘 다 Tag형 컴포넌트네요.
using Unity.Burst;
using Unity.Collections;
using Unity.Entities;
using Unity.Mathematics;
using Unity.Transforms;
using Random = Unity.Mathematics.Random;
namespace HelloCube.RandomSpawn
{
public partial struct SpawnSystem : ISystem
{
uint seedOffset;
float spawnTimer;
[BurstCompile]
public void OnCreate(ref SystemState state)
{
state.RequireForUpdate<Config>();
state.RequireForUpdate<ExecuteRandomSpawn>();
}
[BurstCompile]
public void OnUpdate(ref SystemState state)
{
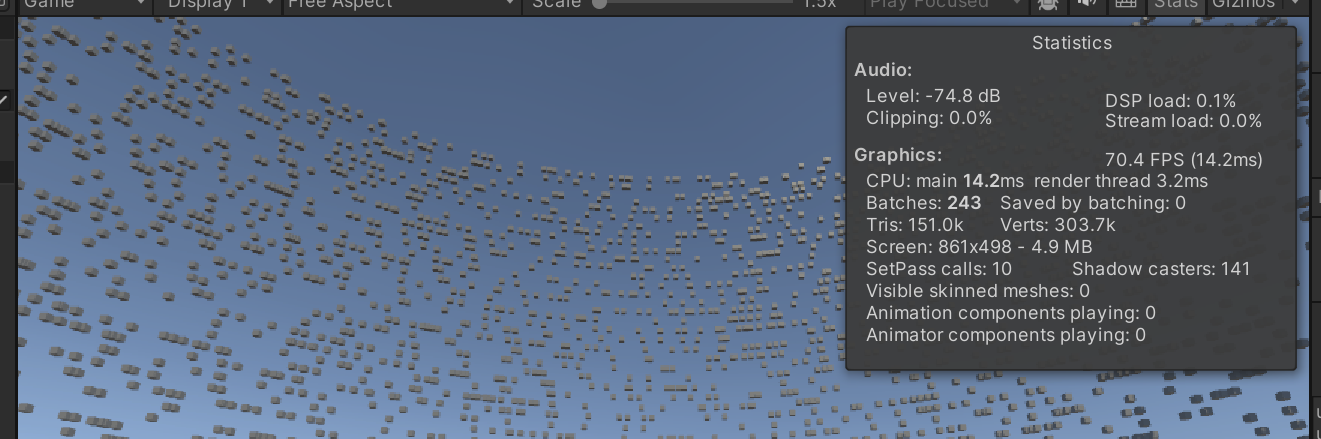
const int count = 200;
const float spawnWait = 0.05f; // 0.05 seconds
spawnTimer -= SystemAPI.Time.DeltaTime;
if (spawnTimer > 0)
{
return;
}
spawnTimer = spawnWait;
// Remove the NewSpawn tag component from the entities spawned in the prior frame.
var newSpawnQuery = SystemAPI.QueryBuilder().WithAll<NewSpawn>().Build();
state.EntityManager.RemoveComponent<NewSpawn>(newSpawnQuery);
// Spawn the boxes
var prefab = SystemAPI.GetSingleton<Config>().Prefab;
state.EntityManager.Instantiate(prefab, count, Allocator.Temp);
// Every spawned box needs a unique seed, so the
// seedOffset must be incremented by the number of boxes every frame.
seedOffset += count;
new RandomPositionJob
{
SeedOffset = seedOffset
}.ScheduleParallel();
}
}
[WithAll(typeof(NewSpawn))]
[BurstCompile]
partial struct RandomPositionJob : IJobEntity
{
public uint SeedOffset;
public void Execute([EntityIndexInQuery] int index, ref LocalTransform transform)
{
// Random instances with similar seeds produce similar results, so to get proper
// randomness here, we use CreateFromIndex, which hashes the seed.
var random = Random.CreateFromIndex(SeedOffset + (uint)index);
var xz = random.NextFloat2Direction() * 50;
transform.Position = new float3(xz[0], 50, xz[1]);
}
}
}
SpawnSystem 코드입니다.
spawnTimer마다 코드가 동작하는 방식입니다.
우선, NewSpawn 태그를 가진 모든 엔티티들을 불러옵니다.
Config에는 NewSpawn / Cube Tag를 가진 큐브의 엔티티를 프리팹으로 가지고 이죠.
NewSpawn Tag를 가진 큐브들에게서 NewSpawn Tag를 빼버립니다.
기존에 있던 큐브들의 Tag를 없애고, SpawnTimer가 지났으니 새로운 큐브를 생성하기 전에 빼둔겁니다.
이후에는 새로운 큐브들을 생성합니다.
랜덤시드를 변경해줘서 생성할 큐브들의 위치도 조정해주었는데요.
새로운 큐브들만 NewSpawn Tag를 갖고 있으므로 Job에 들어갈 엔티티들은 새 큐브들만입니다.
[EntityIndexInQuery] 는 어떤 엔티티인지 알 수 있도록 명시한 값입니다.
using Unity.Burst;
using Unity.Entities;
using Unity.Mathematics;
using Unity.Transforms;

namespace HelloCube.RandomSpawn
{
    public partial struct MovementSystem : ISystem
    {
        [BurstCompile]
        public void OnCreate(ref SystemState state)
        {
            state.RequireForUpdate<ExecuteRandomSpawn>();
        }

        [BurstCompile]
        public void OnUpdate(ref SystemState state)
        {
            var ecbSingleton = SystemAPI.GetSingleton<EndSimulationEntityCommandBufferSystem.Singleton>();

            new FallingCubeJob
            {
                Movement = new float3(0, SystemAPI.Time.DeltaTime * -20, 0),
                ECB = ecbSingleton.CreateCommandBuffer(state.WorldUnmanaged).AsParallelWriter()
            }.ScheduleParallel();
        }
    }

    [WithAll(typeof(Cube))]
    [BurstCompile]
    public partial struct FallingCubeJob : IJobEntity
    {
        public float3 Movement;
        public EntityCommandBuffer.ParallelWriter ECB;

        void Execute([ChunkIndexInQuery] int chunkIndex, Entity entity, ref LocalTransform cubeTransform)
        {
            cubeTransform.Position += Movement;
            if (cubeTransform.Position.y < 0)
            {
                ECB.DestroyEntity(chunkIndex, entity);
            }
        }
    }
}
마지막 MovementSystem 입니다.
이번에도 엔티티를 삭제할 일이 있기 때문에 ECB를 선언해놓았군요.
그외에는 잡을 만들어 모든 큐브에 대해서 Movement를 실행하고 있습니다.
생성 시점과 생성 후의 Tag 변화를 통해 동작을 변화시키는 방식이였네요.
크게 어렵진 않았습니다.
두 방식중에서 편한게 좋겠죠?
그래도 2번째가 좀 더 유연할 것 같긴 하네요.
다음으로는 7번 EnableComponents 입니다.
쉽게, Componet에 bool 속성을 부여한다고 이해하시면 편할겁니다.
쉬운대신에 굉장히 중요한 포인트이기도 합니다.
기본적으로 Entity의 컴포넌트 혹은 엔티티 자체를 추가/ 삭제 하는 행위는 굉장히 무거운 일입니다.
대신에 해당 Enable 속성을 가진 컴포넌트는 자체로 True/False를 하더라도 Structual Change가 일어나지 않습니다.
적극적으로 사용하도록 합시다.
using UnityEngine;
using Unity.Entities;
using Unity.Mathematics;

namespace HelloCube.EnableableComponents
{
    public class RotationSpeedAuthoring : MonoBehaviour
    {
        public bool StartEnabled;
        public float DegreesPerSecond = 360.0f;

        public class Baker : Baker<RotationSpeedAuthoring>
        {
            public override void Bake(RotationSpeedAuthoring authoring)
            {
                var entity = GetEntity(TransformUsageFlags.Dynamic);

                AddComponent(entity, new RotationSpeed { RadiansPerSecond = math.radians(authoring.DegreesPerSecond) });
                SetComponentEnabled<RotationSpeed>(entity, authoring.StartEnabled);
            }
        }
    }

    struct RotationSpeed : IComponentData, IEnableableComponent
    {
        public float RadiansPerSecond;
    }
}
RotationSpeedAuthoring 코드를 보겠습니다.
컴포넌트 부분에 변화가 생겼네요. IEnableComponent 라는 새로운 인터페이스가 있습니다.
그리고 Bake 소스 부분을 보면, SetComponentEnabled로 해당 컴포넌트의 상태를 바꿔줄 수 있습니다.
authoring.StartEnabled 라는 멤버 bool 변수에 따라 bake 방법이 바뀌고 있는데요.
실제로 예제를 실행 해보면, 3개의 큐브에는 bool 체크가 되어있고, 나머지 3개는 체크가 해제 되어있습니다.
짝/홀 번갈아가며 실행되는 걸 보여주고 싶었나 보군요.
using Unity.Burst;
using Unity.Entities;
using Unity.Transforms;

namespace HelloCube.EnableableComponents
{
    public partial struct RotationSystem : ISystem
    {
        float timer;
        const float interval = 1.3f;

        [BurstCompile]
        public void OnCreate(ref SystemState state)
        {
            timer = interval;
            state.RequireForUpdate<ExecuteEnableableComponents>();
        }

        [BurstCompile]
        public void OnUpdate(ref SystemState state)
        {
            float deltaTime = SystemAPI.Time.DeltaTime;
            timer -= deltaTime;

            // Toggle the enabled state of every RotationSpeed
            if (timer < 0)
            {
                foreach (var rotationSpeedEnabled in
                         SystemAPI.Query<EnabledRefRW<RotationSpeed>>()
                             .WithOptions(EntityQueryOptions.IgnoreComponentEnabledState))
                {
                    rotationSpeedEnabled.ValueRW = !rotationSpeedEnabled.ValueRO;
                }

                timer = interval;
            }

            // The query only matches entities whose RotationSpeed is enabled.
            foreach (var (transform, speed) in
                     SystemAPI.Query<RefRW<LocalTransform>, RefRO<RotationSpeed>>())
            {
                transform.ValueRW = transform.ValueRO.RotateY(
                    speed.ValueRO.RadiansPerSecond * deltaTime);
            }
        }
    }
}
이를 활용한 코드 역시 매우 간단합니다.
                foreach (var rotationSpeedEnabled in
                         SystemAPI.Query<EnabledRefRW<RotationSpeed>>()
                             .WithOptions(EntityQueryOptions.IgnoreComponentEnabledState))
                {
                    rotationSpeedEnabled.ValueRW = !rotationSpeedEnabled.ValueRO;
                }
일단 옵션을 통해 Enabled가 안되어있더라도 모든 RotationSpeed를 가진 엔티티를 불어온 다음.
해당 bool값을 반대로 역전 시켜주기만 하면 끝납니다.
그리고 아래 쿼리부분에서는 Enable 된 엔티티만 매칭하므로
True로 되어있는 큐브들만 움직이겠죠.
참 쉽지만, 게임을 만드는데 있어서 매우 중요한 기능입니다.
탄막을 직접 만들어보자.
위의 샘플 예제를 조합하여 만들어본 테스트 프로젝트이다.
탄막 발사, 이동, 활성화 기능이 포함되어있다.
https://www.youtube.com/watch?v=GNLbDWhIkAU
(1) 움직이는 Spawner
(2) Spawner 위치에서 탄막 생성
(3) 탄막이 발사 된 뒤에 천천히 이동하다가 아래로 떨어지게 되는 것 IEnableableData로 구현되었다.
작성한 코드는 다음과 같다.
using System.Collections;
using System.Collections.Generic;
using UnityEngine;
using Unity.Entities;
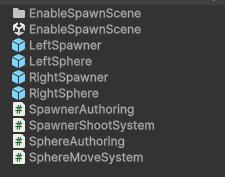
public class SphereAuthoring : MonoBehaviour
{
public bool isLeft;
public class Baker : Baker<SphereAuthoring>
{
public override void Bake(SphereAuthoring authoring)
{
var entity = GetEntity(TransformUsageFlags.Dynamic);
AddComponent<SphereSide>(entity, new SphereSide() { isLeft = authoring.isLeft });
AddComponent<SphereFlowing>(entity, new SphereFlowing() { curTime=SphereFlowing.flowTime });
AddComponent<SphereBound>(entity);
AddComponent<newSpereTag>(entity);
SetComponentEnabled<SphereBound>(entity, false);
}
}
}
public struct newSpereTag : IComponentData
{
}
public struct SphereSide : IComponentData
{
public bool isLeft;
}
public struct SphereFlowing : IComponentData
{
public float curTime;
public const float flowTime = 0.8f;
}
public struct SphereBound : IComponentData, IEnableableComponent
{ }SphereAuthoring 코드는 다음과 같다.
Tag 역할을 하는 newSpereTag (실제로는 해당 코드에서는 필요없기는 하다.)
좌우 bool값을 가진 SphereSide 컴포넌트
타이머 역할을 하는 SphereFlowing 컴포넌트
활성화 역할을 하는 SphereBound 컴포넌트
4개의 컴포넌트를 가지고 Sphere 라는 탄막 엔티티를 만들었다.
using HelloCube.RandomSpawn;
using Unity.Burst;
using Unity.Entities;
using Unity.Mathematics;
using Unity.Transforms;
using UnityEngine;


public partial struct SphereMoveSystem : ISystem
{

    [BurstCompile]
    public void OnCreate(ref SystemState state)
    {
        state.RequireForUpdate<SphereSide>();
        state.RequireForUpdate<SphereFlowing>();
    }

    public void OnUpdate(ref SystemState state)
    {

        float deltaTime = SystemAPI.Time.DeltaTime;
        var ecbSingleton = SystemAPI.GetSingleton<BeginSimulationEntityCommandBufferSystem.Singleton>();
        var ecb = ecbSingleton.CreateCommandBuffer(state.WorldUnmanaged);


        foreach (var (flow, side, bound, entityTrs)
            in SystemAPI.Query<RefRW<SphereFlowing>, RefRO<SphereSide>, EnabledRefRW<SphereBound>, RefRW<LocalTransform>>()
            .WithOptions(EntityQueryOptions.IgnoreComponentEnabledState))
        {
            flow.ValueRW.curTime -= deltaTime;
            if (flow.ValueRO.curTime < 0f)
            {
                bound.ValueRW = true;
            }
            else
            {
                if (side.ValueRO.isLeft) // LEFT
                {
                    entityTrs.ValueRW.Position += new float3(-5.5f * deltaTime, -10 * deltaTime, 0f);
                }
                else // RIGHT
                {
                    entityTrs.ValueRW.Position += new float3(5.5f * deltaTime, -10 * deltaTime, 0f);
                }
            }
        }


        foreach (var (bound, entityTrs, entity)
            in SystemAPI.Query<RefRO<SphereBound>, RefRW<LocalTransform>>().WithEntityAccess())
        {
            entityTrs.ValueRW.Position += new float3(0f, -0.2f, 0f);

            if (entityTrs.ValueRO.Position.y < -20f)
            {
                ecb.DestroyEntity(entity);
            }
        }


    }
}
특정 위치 아래로 가면 삭제되기 떄문에 Entity Command Buffer (ECB)를 사용하였다.
curTime이 0이 될떄까지는 조금씩 이동하다가, 0이 된 이후부터는 아래로 떨어지도록 구성하였다.
꺼두었던 SphereBound가 true 로 변경되면서, 아래의 foreach문을 이동하도록 하고 있다.
using System.Collections;
using System.Collections.Generic;
using UnityEngine;
using Unity.Entities;

public class SpawnerAuthoring : MonoBehaviour
{
    public bool isLeft;
    public GameObject LeftPrefab;
    public GameObject RightPrefab;

    public class Baker : Baker<SpawnerAuthoring>
    {
        public override void Bake(SpawnerAuthoring authoring)
        {
            var entity = GetEntity(TransformUsageFlags.Dynamic);
            AddComponent<SphereSide>(entity, new SphereSide() { isLeft = authoring.isLeft });

            AddComponent<SpawnComponent>(entity,
                new SpawnComponent()
                {
                    LeftPrefab = GetEntity(authoring.LeftPrefab, TransformUsageFlags.Dynamic),
                    RightPrefab = GetEntity(authoring.RightPrefab, TransformUsageFlags.Dynamic)
                }
                );


        }
    }
}
public struct SpawnComponent : IComponentData
{
    public Entity LeftPrefab;
    public Entity RightPrefab;
}
SpawnerAuthoring 스크립트는
Sphere Prefab을 담을 SpawnComponent로 구성하였다.
using UnityEngine;
using Unity.Entities;
using Unity.Burst;
using Unity.Transforms;
using Unity.Mathematics;
using HelloCube.Prefabs;
using Unity.Collections;
using Unity.VisualScripting.YamlDotNet.Core;

public partial struct SpawnerShootSystem : ISystem
{
    float deltaTime;
    float curTime;
    float3 leftPose;
    float3 rightPose;

    [BurstCompile]
    public void OnCreate(ref SystemState state)
    {
        curTime = 0.2f;
        deltaTime = 0;
        state.RequireForUpdate<SpawnComponent>();
        state.RequireForUpdate<SphereSide>();
    }

    public void OnUpdate(ref SystemState state)
    {
        deltaTime += SystemAPI.Time.DeltaTime;
        curTime -= SystemAPI.Time.DeltaTime;


        foreach (var (side, prefabBucket, entityTrs)
            in SystemAPI.Query<RefRO<SphereSide>, RefRO<SpawnComponent>, RefRW<LocalTransform>>())
        {
            if (side.ValueRO.isLeft)
            {
                entityTrs.ValueRW.Position = new float3(math.cos(deltaTime * 1f) * 10f, 5f * math.sin(deltaTime * 2f), 0f) / 2;


                if (curTime < 0f)
                {
                    var leftprefab = prefabBucket.ValueRO.LeftPrefab;

                    // Instantiating an entity creates copy entities with the same component types and values.
                    var instances = state.EntityManager.Instantiate(leftprefab);
                    state.EntityManager.SetComponentData<LocalTransform>(instances, new LocalTransform()
                    {
                        Position = entityTrs.ValueRO.Position,
                        Rotation = quaternion.identity,
                        Scale = SystemAPI.GetComponent<LocalTransform>(prefabBucket.ValueRO.LeftPrefab).Scale
                    });

                }

            }
            else if(side.ValueRO.isLeft == false)
            {
                entityTrs.ValueRW.Position = new float3(-math.cos(deltaTime * 1f) * -10f, 5f * -math.sin(deltaTime * 2f), 0f) / 2;

                if (curTime < 0f)
                {
                    var rightprefab = prefabBucket.ValueRO.RightPrefab;

                    // Instantiating an entity creates copy entities with the same component types and values.
                    var instances = state.EntityManager.Instantiate(rightprefab);
                    state.EntityManager.SetComponentData<LocalTransform>(instances, new LocalTransform()
                    {
                        Position = entityTrs.ValueRO.Position,
                        Rotation = quaternion.identity,
                        Scale = SystemAPI.GetComponent<LocalTransform>(prefabBucket.ValueRO.RightPrefab).Scale
                    });
                }

            }
        }

        if (curTime < 0f)
        {
            curTime = 0.15f;
        }

    }
}
Left인 경우에는 시계방향, Right인 경우에는 반시계방향으로 회전하도록 코드를 구성하였다.
curTime이 0이 될떄마다, Sphere를 생성하게 되는데
SetComponetData를 이용해서 생성 위치를 엔티티 자신의 위치로 조정하였다.
Rotation / Scale 까지 값을 적어주지 않으면 화면에 보여지지 않으므로 주의하자.
코드 자체는 썩 훌륭하진 않지만, 이래저래 동작하게는 만들었다.
좀 더 다듬고 IJobEntity도 이용했으면 좋았을 것이다.
이상, 포스팅을 마치도록한다.
다음 포스팅은 ECS에서 사용자 입력을 받는 방법에 대해 설명할 것이다.